
Bat 'em if you got 'em! If not, we'll show you how to get 'em. :)
This tut shall hopefully teach you the art of winking (and blinking) in cyberland. My first "official" tutorial. I've applied to TWI just in case it's not my last. LOL! I hope to be sporting their logo when I'm approved, which could take up to 14 days according to their website. Didn't wanna make you wait that long. Well, I suppose that's IF I'm approved at all! Hope you'll find me helpful, in any case. :)
That being said, this tutorial is completely my own creation, and hopefully dissimiliar to any other out there. If not, that would be completely unintentional, yet certainly possible, as this technique is really rather easy! ;) All you need in the way of supplies are any version of PSP and Animation Shop. I used PSP 9 for this one. I'm also assuming you have at least a basic understanding of the tools and commands. Though I tend to overthink things, so you may get more information than you bargained for! ;)
Are you ready? Let's get started:
1. Pick a tube, any tube. It really doesn't matter, as long as it has two eyes and a face. ;) As you saw above, I'm using the beautiful art of Jamie Kidd. You can find this tube and many other glorious gals at CILM. Please visit there first if you don't already have a license. Just be sure to remember to come back! LOL! Lots of taggin' eye candy there, indeed. ;)
2. Open your tube in PSP. If you can't be trusted (like me! LOL!) Shift + D to duplicate it, then close the original. On the remaining tube, duplicate it via the layer palette or the Layers menu so you'll have two layers within the same image rather than two separate images. Rename your bottom layer "Eye Open" then close/hide it. Now activate your top layer and rename it "Eye Closed." It may help to zoom in at this point.

When you feel like you have a good view, activate your Push Tool. "Huh," you say? LOL! I've taken the liberty of showing you where it is. ;) Look right underneath the Clone tool. You may have to right-click the icon to select the Push Tool in the list of tool and brush choices. The Smudge Brush/Tool can also work for this, I just prefer the Push.
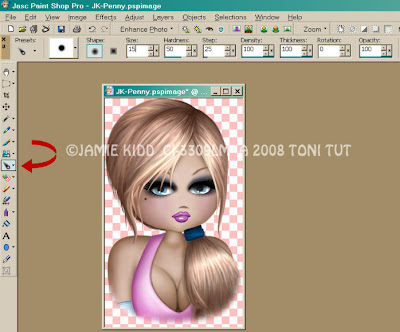
3. Adjust your settings similiarly to mine. You may have to adjust the size option up or down accordingly depending upon how much you needed to zoom in. Now, envision how your tube's eye should look closed. As a general practice, I find it helpful to start from either side of the eye and work toward the opposite corner, rather than starting in the middle somewhere.
Using your mouse, position the tool up high, near an upper corner or the bottom of an eyebrow. This particular tube is fairly easy because we don't even have to go up that far. Now, left click, hold, and drag down until you've reached the bottom of the eye. If the tube has bottom lashes, release just before you're ready to overlap them. Basically, now you're going to play makeup artist and continue to push the eyelid down and around until its makeup and/or bare skin looks "natural" and has completely covered the formerly open eye. Move the darker parts where the shading gives a natural appearance, swipe over any lines or creases to make them look smooth. Further reducing the hardness will help when it's time for finessing. You may even have to take some of the nose area "skin" and push it back over the inner corner of the eye if there's any sticking out a little too far.
The Clone brush can also be your friend when it's time to smooth and straighten. However, if you'll just relax and let your mouse guide you, you can most likely do the entire job with only the Push Tool.
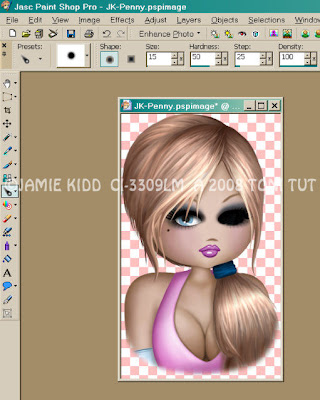
4. Now you're all shaded and have two layers, one with an open eye, one closed. Unhide both layers. Do not move either layer without linking them first or your finished animation will "jump." To finish the easy way, time to open Animation Shop. Activate your bottom layer in PSP, the open eye. Edit/Copy, paste into AniShop as a New Animation. Go back to PSP and activate the top layer, the closed eye. Edit/Copy again and paste into AniShop, this time either Before or After Current Frame.
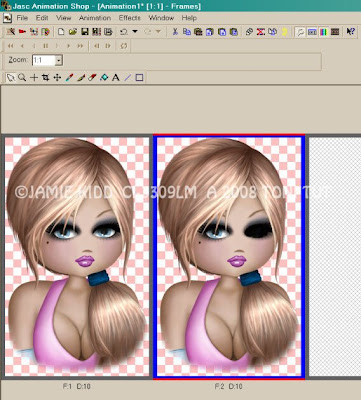
5. Adjust the timing of your frames to roughly 25 for the closed eye, 75 for the open.
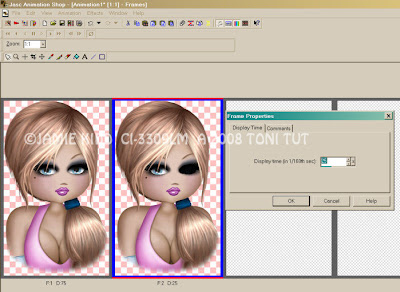

Optimize and save as a .gif. Now you're winkin' and blinkin, baby! LOL! Save your layered PSP image in case you want to use it again. Please see my Lavenderlicious tutorial (to follow) for more on how to do that.
Hope you've enjoyed this tutorial and will find it helpful should the need to bat ever arise in the future. ;)


No comments:
Post a Comment