
The black-background version of what we're making today. This tutorial is my own creation. Any similiarity to any other is completely unintentional. It is registered with Tutorial Writers, Inc. in the hopes of preventing that. Please do not pass the tutorial around by email. You may, however, share a direct link to the tutorial page or the blog itself. I'd be most pleased and honored if you did so. :)
As for supplies, you will need four tubes of choice. If copyrighted, they must be from the same artist. Try to choose four that are similiar in design, color or theme. I'm using the beautiful artwork of Jennifer Janesko. Please do not use the same tubes unless you've purchased them and received the accompanying license from CILM. You will also need a scrap kit with a multi-compartment frame. The Cosmopolitan scrap kit is from yours truly and available at Sophisti-Scraps. Lastly, you'll need PSP (any version from 9 on up should work; I'm using X2), and Animation Shop. I will assume you have at least a basic understanding of the tools, commands and effects within PSP.
Alrighty, then. Start those engines! Remember to save often along the way. And you will definitely want to rename your layers on this one! ;)
Open a new canvas, 800 x 800. If you'd like to give it a background color now, go ahead and do so by unchecking the Transparent box in the New Image dialog, then choosing a color from the color-picker box, or flood-filling after the new image is open. I'm going to wait until later to do mine. It really doesn't matter for this particular tag, so do whatever you're comfy with. Make sure the layer is named "Background."
Open the tube you plan to put at the bottom of the tag. Copy/paste or drag-n-drop to your new canvas. To drag-n-drop, activate the tube image by clicking it. Highlight the tube's appropriate layer in your palette. Place your cursor on the layer name in the palette, left click, and simply "drag" the tube layer over to your new canvas. Release the mouse to "drop" it. PSP will normally put it right in the center of the canvas. Nifty little trick, eh? ;) Rename this layer "Bottom Tube" and drop shadow as desired.
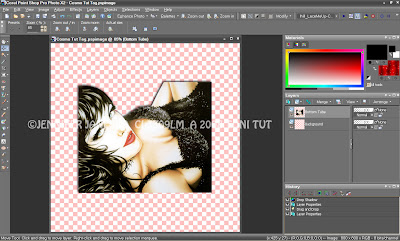
Now open Frame-01 from Cosmopolitan. Copy/paste or drag-n-drop to your canvas. Rename this layer "Zebra Frame." Vertically flip the frame and drop-shadow lightly. Resize your tube and/or frame so the tube fits "squarely" at the bottom of the frame. Don't worry if you can't hit it exactly. When you're close enough in range, grab the Pick Tool (located with the Move Tool, known as Warp or Deform in earlier versions) to scale the frame in either direction. I resized both tube and frame to 75%, then used the Pick Tool to scale the frame vertically upwards, like this:
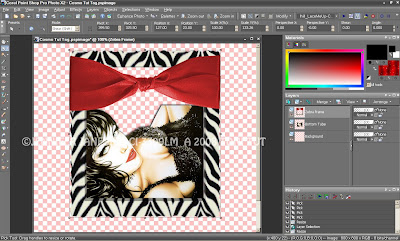
Now, move everything down to the bottom center of your canvas and realign if necessary. Give it a save while you're at it. ;)
Open Doodle-01 from Cosmopolitan. Copy/paste or drag-n-drop it to your canvas. Move it in the palette so it's above your Background layer and below your Bottom Tube layer. Resize accordingly so the doodle looks nice behind the upper part of the frame. Drop shadow to your liking, then duplicate the layer. On the Copy layer, flip vertically, then mirror horizontally — Image/Flip, Image/Mirror — or vice versa if you prefer. Move the copy layer down, towards the bottom of the frame and arrange both doodles to your liking. On your layer palette, highlight the Copy layer and Merge Down. Rename the merged layer "Doodles."
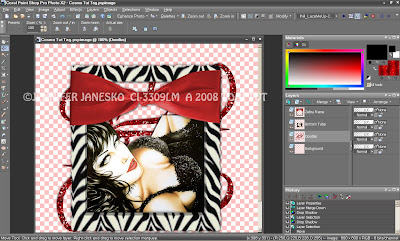
Now we're gonna get a little more progressively complicated. But, you can do it, I promise! In fact, I'm sure you can do it. Whether or not I can write it is a different story! ;) I shall try my best not to confuse you, especially when it's time to animate. If you rename your layers as I've indicated, hopefully you won't have trouble staying with me. Fingers crossed! :)
Open Frame-02 from Cosmopolitan. Resize so it fits nicely over the red wrapper of the zebra frame. I resized to 65%. Rename your layer "Film Frame." Turn off / close / hide all layers except Film Frame, making sure Film Frame is highlighted in your palette. Take your magic wand and select inside each of the film squares. Now go to Selections/Modify/Expand and do it by 2 pixels, like this:
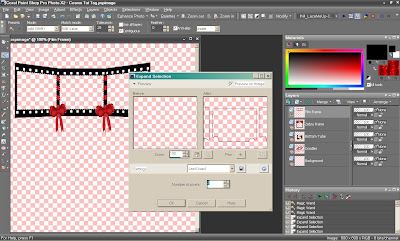
We've just selected the interior sections of the film frame and expanded them so they'll overlap slightly beyond the border for neatness. We're going to put our three additional tubes into those boxes. Well, their faces, anyway! LOL! There will be overlap that we'll want to easily clean up. Hit Selections/Invert to switch the selection you've just made to encompass everything EXCEPT the film frame boxes.
Now open your additional tubes and copy/paste or drag-n-drop them to your canvas, underneath Film Frame. Resize and arrange them as you like, and as necessary to fit into the squares. Once a tube is positioned in its respective box, hit the Delete key on your keyboard to remove the extraneous portions. If there are still stray pixels remaining, select/delete manually or use your Eraser Tool to remove them. Rename the tube in the left box to "Left Tube 1." Now do the same thing for the middle and the right squares, being sure to rename the layers to "Middle Tube 1" and "Right Tube 1." Do not de-select. This is what you should have so far:
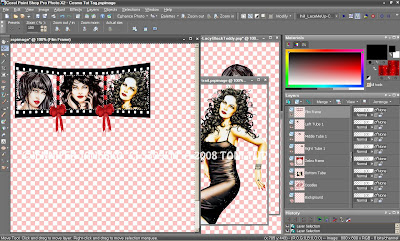
Now you're going to do that twice more, to fill two more film frames, or six more squares, for a total of nine fill layers. You'll have added layers "Left Tube 2, Middle Tube 2, Right Tube 2 and Left Tube 3, Middle Tube 3, Right Tube 3" when you're finished. Arrange the tubes in each film frame so the same tube doesn't appear in the same box twice. Shut off / close / hide each layer after you've completed a frame so it won't interfere in the set you're working on. You may de-select when you're done, as well.
Make sure the Film Frame layer is at the top of your palette and give it a light drop shadow. Now highlight the uppermost of your fill layers. Give it a drop shadow of your choosing. Select the next layer underneath in the palette. Hit "Control + Y" on your keyboard to repeat the same shadow. Repeat this process all the way down until you've drop-shadowed all nine of your fill layers. Go ahead and turn all your layers back on, or View All, but do NOT move any of these layers from this point forward. Now would be a really good time to save it, too! ;)
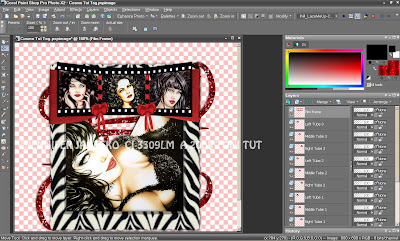
Now we have the base for our tag. So it's time for the fun stuff, the accessories. And it's time for me to add a background color, as I'm pretty sure I'll want to change up the accessories for a black background vs. white. For the black background, I'm using Bow-01 in the upper left-hand corner, Flower-05 lower left, Pin-01 upper right (erasing a little section so it looks like it's going through the wrap), Brad-02 on the right and Gloves-02 up top. Resize, rotate, drop shadow accordingly, and be sure to rename your layers.
Now it's time to add your name. I'm using A&S Snapper script, which is a pay font, but there's a knockoff available called "Snappy Script Light" which looks just like it and can probably be found at Fonts101.com or Dafont.com. It pains me not to be using glitter (hehe!) but it wouldn't be very seamless upon animation, so I'm going to forego the glitter and additional bling except for a sparkle tube or two I just can't stop myself from using. ;)
Crop your tag to Merged Opaque (shut off your background layer first), resize as desired. Add your artist copyright and save. Here's what we have now:
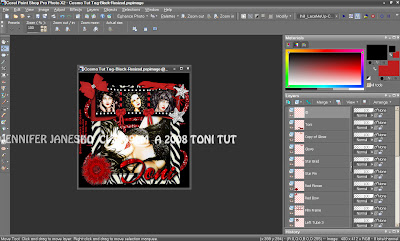
Time for the animation. Pay close attention to your layer palette to be sure you don't miss anything. The technique itself isn't hard, but if you lose track of where you are or forget to change a setting on one of the layers, the animation won't look right. Ready? Open every layer, except for Left Tube 2 through Right Tube 3; meaning, the only open fill layers should be Left Tube 1, Middle Tube 1 and Right Tube 1. All of your other layers are also open/visible. Highlight any of the visible layers in your palette and Copy Merged to Animation Shop as a new animation.
Now, reduce the opacity of Left Tube 1, Middle Tube 1 and Right Tube 1 down to 50%. Open Left Tube 2, Middle Tube 2 and Right Tube 2. Reduce their opacity down to 50%, as well. Again, Copy Merged to Animation Shop, but after current frame this time.
Back to PSP. Close Left Tube 1, Middle Tube 1 and Right Tube 1. Increase the opacity of Left Tube 2, Middle Tube 2 and Right Tube 2 to 100%. Copy Merged and paste to AniShop after current frame. You should now have three frames.
Back in PSP again, reduce the opacity of Left Tube 2, Middle Tube 2 and Right Tube 2 down to 50%. Open Left Tube 3, Middle Tube 3 and Right Tube 3. Reduce their opacity down to 50%. Copy Merged and paste into AniShop, after current frame.
Back to PSP. (Do you have whiplash yet? LOL!) Close Left Tube 2, Middle Tube 2 and Right Tube 2. Increase the opacity of Left 3, Middle 3 and Right 3 to 100%. Copy Merged and paste into AniShop, after current frame.
Back to PSP. Last time, I promise! Reduce the opacity of Left 3, Middle 3 and Right 3 down to 50% again. Open Left Tube 1, Middle Tube 1 and Right Tube 1. Reduce their opacity to 50% if not still at that setting from before. Copy Merged and paste into Ani Shop after current frame. You should now have six frames. Whew!! ;)
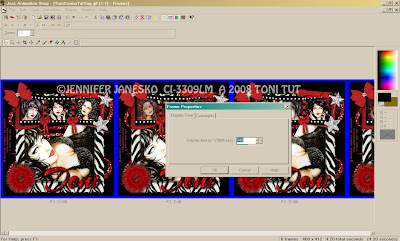
Control + A to select all of your frames. Right click and set the timing (under Frame Properties) to 100. Now click each of the "morph" frames, i.e. 2, 4, and 6, and individually set their timing to 40. Annihilate (or Optimize, as they call it LOL!), save as a .gif and you're done! :)
Thanks so much for doing my tut. Hope I didn't confuse you too much, and you have a pretty new outfit to wear! :)





3 comments:
Hi Toni wow congrats i'm so happy for you hun you deserve it Clim good on you also love this tut and scrap-kit well done hugs Gaylene xxxxx
You've been tagged!
See my blog for details :)
http://cinnamonscraps.blogspot.com
Hugs,
Laura
You have been tagged
Find details on my blog
TeesScraps
Post a Comment