
Hi, gang! Along with the new kits, here's the first of two new tuts I hope you'll enjoy. So let's get the boring stuff right out of the way. This tutorial is my own creation and is registered with Tutorial Writers, Inc.. Please do not pass it around by email or re-post it on any forum. You may, however, share the link to the blog or the tutorial page directly. I'd be extremely pleased and honored if you did so. :)
I've made two versions of this tag, one on a white background and one on black, to match here. You'll notice in the white tag (at the bottom of the tutorial) that I've used a mask to add background color. I chose to omit it from the black tag because it somehow appeared more "cluttery" against the dark color. The tut will include mask directions, so you can make it either way, as well.
This tag is also a little different in the way it's put together. I tend to think of animating as being a somewhat "horizontal" process because we build and paste the frames to lay that way in Ani Shop, even though we've layered "vertically" in PSP to make them. This tag is also more of a vertical process in AniShop, as it will have a "bottom," a "middle," and a "top" we'll make in PSP, but will put together in AniShop. The "sandwich" approach is necessary in order to maintain the elements in proper order so they're unobstructed by other elements. You'll see what I mean later on, I promise! ;)
As for supplies, I'm using the beautiful art of Jamie Kidd. If you'd like to use the same mermaid, please visit CILM to purchase the tube and accompanying license. The Sun of a Beach scrap kit is from yours truly and available at Sophisti-Scraps. The add-on portion is here at the blog, under the label Freebies. I'm using the font AL Playbook for my name. I've uploaded the the glitter fill frames and the underwater .jpg for you here. Just take the glitter frames and drop them into your Patterns folder. On the white tag, as I mentioned, I used WSL Mask 143 from the very talented Chelle of WeeScotsLass.co.uk. Place it in your Masks folder. Along with the rest of Chelle's fantastic collection! LOL! Thank you, Chelle! :)
You will also need PSP and Animation Shop, of course. To complete the "basic" effect of the tag, they're all you need in the way of software. However, if you'd like to animate the frame and sparkle the accessories, you'll also need to visit Area 51 and load up on Alien Skin's Eye Candy 3.1 or 4000 (for HSB Noise) and Xenofex 1 or 2 (for Constellation). The newest versions can be found at the Alien Skin website.
Alrighty then! I think we're ready to phone home. ;)
Open a new canvas, 800 x 800. Again, I like to work big then size down to avoid feeling cramped. I wound up needing the room in order to fit in my name! LOL! So, if 800 x 800 is too big for your taste, just make sure to leave yourself enough "extra" room to maneuver. Give yourself a background color by unchecking the Transparent box in the New Image dialog and choosing a color from the Color Picker box, or flood-filling after the image is open.
Open your tube and copy/paste or drag-n-drop it to your new canvas. Drag-n-dropping has been explained and diagrammed in my Lavenderlicious tutorial. Basically, all you have to do is highlight the tube layer you want in your palette, then left-click again and "drag" the layer from the palette over to your new canvas. Release the mouse to "drop" it. You can even copy a layer within the same image by dragging it to the same canvas. Trés easy! :)
Close your original tube image. Rename your new tube layer "Mermaid." Leave her be for just a minute and open Frame-01 from Sun of a Beach. Copy/paste or drag-n-drop to your canvas. Rename this layer "Frame" and drag it in your palette so it's above the Background and below Mermaid. As you can see, this particular tube conflicts with the wrap on the frame, so I've mirrored her (Image >> Mirror) to place her on the other side instead. Give her a drop shadow of choice.
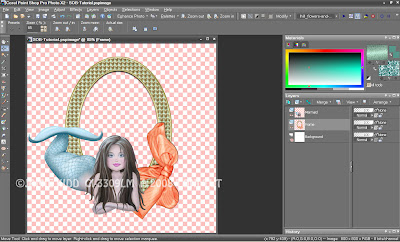
Now close / hide / shut-off your Mermaid layer. I've closed my Background layer as well. Activate your Magic Wand and set Mode to Add, Match Mode to RGB Value, Feather and Tolerance to Zero. Make sure Frame is the active layer in your palette and click somewhere inside the transparent area of your frame. Click again in the space between the wrap and the bottom of the frame or you'll be kicking yourself later. LOL! Now go to Selections >> Modify >> Expand, and do it by 10 pixels, like this:
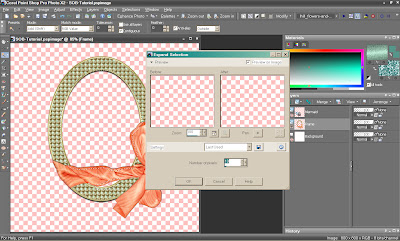
Do not de-select. Open the underwater .jpg and copy/paste or drag-n-drop it to your canvas. Move it in the palette so it's above the Background and underneath the Frame. Rename this layer "Water." Use the Move Tool to position the picture to your liking inside the frame. When satisfied, go to Selections >> Invert to flip the selection from inside of the frame to everything outside of it. Being sure Water is the active layer in your palette, hit the Delete key to remove the extraneous portions of the picture. Now you have a nice, neatly framed picture with no open holes and nothing to erase, like this:
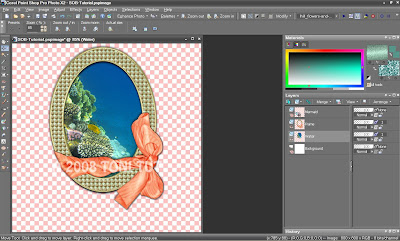
Give Frame a light drop shadow, and give your image a save. Go ahead and turn Mermaid back on so you can see her. Open Doodle-03 from Sun of a Beach and copy/paste or drag-n-drop to your canvas. Position in your palette so it's above the Background and underneath Water. Rename this layer "Doodles," then duplicate it. Mirror the copy layer and arrange them both behind the frame, one on each side. Make the copy layer active and Merge Down. There are going to be extraneous portions of the Doodles that we'll want to clean up. Not as easily as we did the frame, but not with too much difficulty, either. Use the Eraser Tool to manually erase the extra parts, or use the Lasso Tool (located with your Magic Wand) to select around them, then hit Delete on your keyboard. Give Doodles a drop shadow. Here's what we have now:
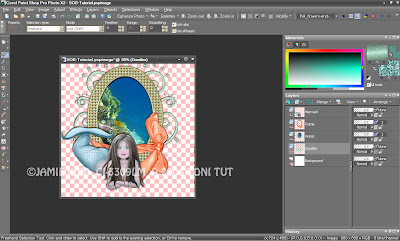
Open Paper-03 from Sun of a Beach or use one from the add-on. Copy/paste or drag-n-drop to your canvas. Drag it in the palette so it's below Doodles and above the Background. Go to Layers >> Load/Save Mask >> Load Mask from Disk. You can also load a mask from an open image instead. However, if you'd ever like to use it again, IMHO it's just easier to "put it away" once and know it's there whenever you want it. Your Mask folder can be organized with subfolders if you'd like to group them by category or "manufacturer" for easier reference. But that's a "how-to" for another day! ;)
Back to the tagging ranch, navigate to WSL Mask 143. Source Luminance and Fit to Layer should be checked. On this particular mask, it doesn't matter if Hide All or Show All is checked, so use one of the two. Click OK. Now go to your palette, highlight Mask, right-click and Merge Group. This "flattens" the layers of the mask into one so it's easier to work with. Rename this layer "Mask." The effect was a bit subtle for my taste, so I duplicated the Mask layer to increase the color intensity, then Merged Down to condense Mask back into one layer. Here's what we have now:
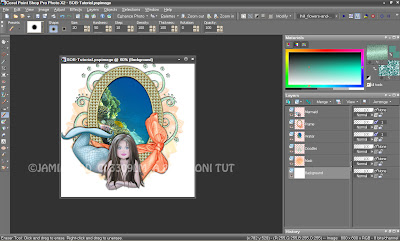
Now it's time to adorn. I used all three flowers from the Sun of a Beach add-on, and Charm-02 from the main kit, the dolphin. Resize and arrange your accessories to your liking, and make sure to rename your layers accordingly. Drop shadow any elements you desire.
Then it will be time to add your name. I put mine down at the bottom and rotated for better fit. I used Green Neptune glitter for the Background / Fill and Green Seafoam Shimmer glitter for the Foreground / Stroke. If you put them in your Patterns folder as I mentioned above, just load them directly from the Color Palette. Put Green Seafoam Shimmer-01 in the Foreground and Green Neptune-01 in the Background. Activate your Text Tool and type out your name in the appropriate size for your tag. Rotate and/or move it exactly where you want it. Rename your layer to "Name," or your name, then duplicate the text layer twice, for a total of three. Do not move these layers from this point forward.
Move to the Copy layer in your palette and click the "+" next to the layer name to expand the contents of the layer, similiar to how your Mask layer looked before you merged it. Underneath you'll see the text you typed as if it were the layer name. Double-click that line in the palette to activate the Text Tool again. A box will pop up with your text in it, called the Text Entry Box. Make sure the text in the box is highlighted. Leave the box open and go to your Color Palette. Change the Foreground and Background patterns to the "02's" of the respective glitters. Click the OK button in the Text Entry box to apply the new glitter fills. Now do the same thing on Copy 2 of your Name layer, changing your patterns to the "03's" of the glitter frames before applying them. Drop shadow Copy 2, then select the Copy layer in your palette and Control + Y to apply the same shadow. Select the original layer and Control + Y again, so all three layers have the same drop shadow.
Now it's time to crop, resize, and add your artist copyright. If you don't want to animate, save as a .jpg and you're done! Hope you've enjoyed the tutorial and had fun. If you're in for the motion of the ocean (LOL!!) save your image, then go get some snackage or some coffee, 'cause you won't be going anywhere for a little while! ;)
The first thing to do from here is to decide if you're only animating the water or you'd like to do the frame and/or sparkle the accessories. If you're only doing the water, ignore the next few paragraphs and catch up with me when it's time to move over to Ani Shop. If you're a sparkle freak like me, choose which accessories you're going to animate and duplicate those layers twice, for a total of three each. I'm using the Constellation effect from Xenofex to sparkle the perimeters of the charm and flowers. It isn't necessary to select anything first. Highlight the layer you want to sparkle and open Constellation. You may have to finesse the settings a little, but they should be similiar to the following. The important thing to note is the Overall Star Density. By placing that on 0, you will only be sparkling the outside of the element. Increasing the Overall Star Density will place sparkles all over the element. We have a lot going on in this tag, so I figured less might actually be more. ;)
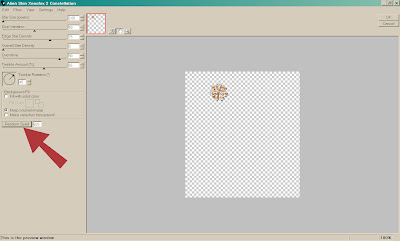
Apply Constellation to your first accessory layer. Then highlight the next one up in your palette and open Constellation again. Your settings from the last layer should still be there. Hit the Random button to vary the sparkle and click OK. Do the same thing to your third layer, and each accessory layer you plan to animate, remembering to hit the Random button each time.
When you're finished Constellating (is that even a word? ;) turn off all layers except Frame. Duplicate Frame twice, for a total of three. Activate your Magic Wand and set the Tolerance to 50. On your original Frame layer, click somewhere in the area where the diamonds are. You may have to click again to be sure all the pixels in that oval strip are selected. If you have trouble, another way you can go is to Select All, then use your Magic Wand in Remove mode to remove the wrap from the selection. Once you're selected, open HSB Noise in Eye Candy 3.1 or 4000. Leave all the settings as they are, except the Hue Variation, which you can turn down a little bit. Here are my settings:
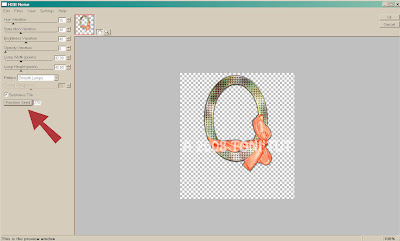
Apply HSB Noise to each of your three Frame layers, remembering to hit the Random button each time on this effect, as well. Here's what we have now:
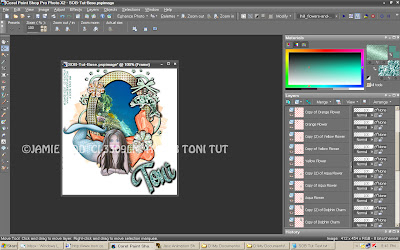
Time to go to AniShop. Well, we'll be going back and forth, so get the neck braces out. LOL! As I mentioned (what seems like days ago, hehe!) at the beginning of this tutorial, it's time for us to make a sandwich. Normally, the first thing we'd need to do with any animated tag is to determine how many frames the animation will have. I sorta cheated at knowing today's answer by making the tag before writing it up. Otherwise, the first step would be doing our fractions and finding the greatest common denominator, i.e. the number of frames our "largest" effect will need. Which is Water, in this particular tag. So, if you were working on your own, you'd be doing the order of operations slightly differently than we will be now. You'd play with Water first, find out how many frames it will take, then tailor the rest of your tag accordingly. In this case, we already know 9 is the magic number. Hence why I had you make three layers of all your effects. ;)
Having had our lil' head start, we're first going to do the background of the tag. Shut off all layers except Background, Doodles, Mask and your copyright. Copy Merged and paste into AniShop as a New Animation. Go back to PSP and close Doodles. Open Copy of Doodles and again Copy Merged. Paste into AniShop After Current Frame. Back in PSP again, close Copy of Doodles and open Copy (2) of Doodles. Again Copy Merged and paste into AniShop After Current Frame.
Still in AniShop, make Frame 1 the active frame by clicking it, then Control + A to select all frames. Edit >> Copy or Control + C. Now highlight Frame 3, right-click and paste After Current Frame, or Shift + Control + L. Left-click back on Frame 3 (the frame to the immediate left of what you just pasted), right-click and paste After Current Frame again. (Or use the keyboard shortcuts, whichever you find easier.) It's important to keep our frames in order or we might get two of the same next to each other, resulting in a latent pause when the animation is played. You can also scroll right, to the last frame, and paste after that one, as well. Either way, you should now have nine frames which look like this:
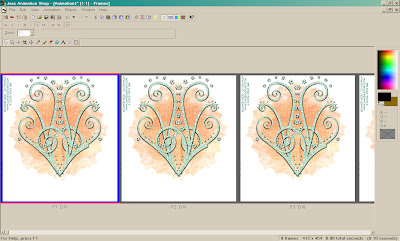
Minimize that animation for now. Back to PSP. Open and highlight the Water layer. Then Select All, as I've shown you in the screenshot below:
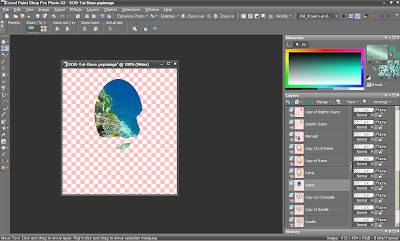
Copy (not Merged, just Copy) Water and paste into AniShop as a New Animation. The reason you're Selecting All first is to maintain the alignment of Water from PSP to AniShop, so it stays in the same exact place on your canvas, and with the same proportion of surrounding space. Otherwise, we'd have to manually line everything up when it's time to combine our sandwich. The less we have to think, the better! ;)
In AniShop, on your lone Water frame, click the Effects menu at the top, then click "Insert Image Effect." Set the radio buttons, sliders and dropdown as you see mine, here:
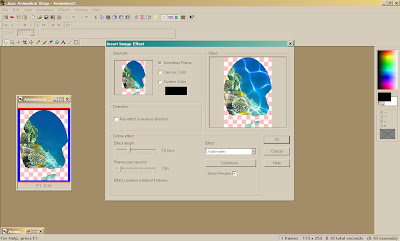
When you're finished, Water will have 10 frames. 9 with animation, Frame 1 will be the original "static" image. Delete Frame 1; we don't need it. Along with the minimized background animation we have going, this is what your Water should look like now:
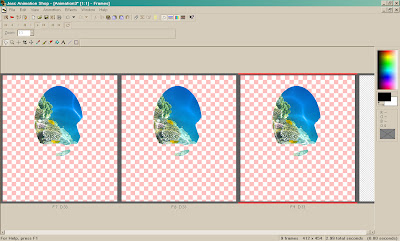
Minimize your Water animation for now, too. 2 down, one to go. ;)
Back to PSP. Close all of your layers or Layers >> View None to save a few clicks. Open Frame, Mermaid, any "original" accessory layers, and your first name layer. Copy Merged and paste into AniShop as a New Animation.
Back to PSP. Close the original layers and open "Copy of" those same layers. Copy Merged to AniShop After Current Frame. If you didn't animate a particular item, just be sure to remember to include the original layer each time. Close the Copy layers and Copy Merged one more time on the "Copy (2)'s of" those layers, until you have three frames in AniShop.
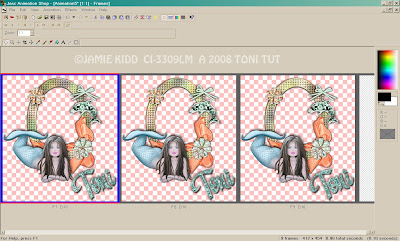
Now our prep work is done, and it's time to actually make our sandwich, i.e. combine the three animations. First, make sure Propagate Paste is selected / active / turned on in the Edit Menu (the icon looks "indented" when it's active). Propagate Paste, as opposed to "regular" Paste, sorta does the math for you when it comes to the greatest common denominator thing. Meaning, if you're pasting an animation with fewer frames than the recipient animation, Propagate Paste will "multiply" the shorter animation and apply it to the remaining frames in the longer animation. If you know your frames are evenly divisible, such as pasting 3 into 9, this can be a handy little timesaver.
Make Frame 1 in the Mermaid / Frame animation active, then Control + A to select all frames. Edit >> Copy or Control + C to copy to the clipboard. Minimize this animation. Now make Water the active animation, and make Frame 1 the active frame. Control + A or Edit >> Select All to select all frames. Click Edit at the top, then click "Paste into Selected Frame." Do not move your mouse; just left-click once to accept the paste. Mermaid, Frame and your name should now be perfectly placed over Water in all 9 frames, looking like this:
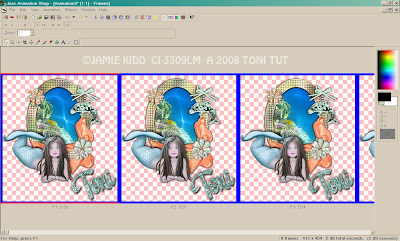
Make sure Frame 1 is still the active frame and that all 9 frames are still selected. Edit >> Copy or Control + C to copy this new animation to the clipboard. Minimize it and make your background animation active. Make sure Frame 1 is the active frame, and that all frames are selected. Click Edit at the top, then "Paste Into Selected Frame." Again, do not move your mouse; just left-click once to accept the paste. Voila! You've made it through the making of the sandwich. :)
If, for some reason, you inadvertently move your hand and the animations aren't lined up when you paste, simply click Edit >> Undo and then "Paste Into Selected Frame" again. "Redo Paste" would put it back where it just was, which you wouldn't want in that particular case. ;)
Now select all of your frames again, right-click and set the timing (under Frame Properties) to 25.
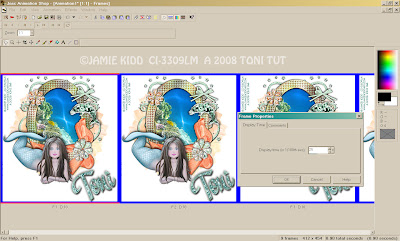
Annihilate the Wizard (er, use the Optimization Wizard LOL!), save as a .gif, and you're finally finished! WTG! Hope you've enjoyed the tut and the pretty new outfit you have! :)





1 comment:
Toni, I just loved this tut, it was fun and I learned alot of new ways to do things in AS. Thanks for sharing it.
Hugs, Ellie
Post a Comment